

A flat tire can happen at the worst possible moment—during your morning commute, on a family road trip, or while driving late at night. While roadside assistance is helpful, knowing how to change a tire on a car yourself is one of the most useful driving skills you can learn.
Changing a tire may seem intimidating if you have never done it before, but the process is actually straightforward when you follow the correct steps and safety precautions. With the right tools and a calm approach, most drivers can replace a flat tire in less than 30 minutes.
According to AAA, flat tires remain one of the most common roadside emergencies in the United States, resulting in millions of assistance calls every year. Learning how to handle the situation on your own can save time, reduce stress, and potentially prevent dangerous roadside situations.
In this beginner-friendly guide, you will learn exactly how to change a tire safely, what tools you need, common mistakes to avoid, and what to do after installing the spare tire.
Why Every Driver Should Know How to Change a Tire
A flat tire can happen without warning. Nails, potholes, sharp debris, worn tread, or sudden blowouts can all leave you stranded.
Knowing how to change car tire safely offers several benefits:
- Helps you avoid being stranded
- Saves money on towing or emergency services
- Reduces waiting time for roadside assistance
- Improves confidence during emergencies
- Keeps you safer in isolated areas
Even if you rarely drive long distances, understanding the basics of tire replacement is an important part of vehicle ownership and emergency preparedness.
Tools You Need Before Changing a Tire
Before you begin, make sure your vehicle has the necessary tools. Most cars come equipped with basic tire-changing equipment stored near the spare tire compartment.
Essential Tire-Changing Tools
Spare Tire
Your spare tire may be:
- A full-size spare
- A compact “donut” spare
Compact spares are temporary and designed only for short-distance use.
Car Jack
The jack lifts the vehicle off the ground so you can remove the wheel.
Lug Wrench
This tool loosens and tightens the lug nuts holding the wheel in place.
Wheel Chocks
Wheel chocks prevent the vehicle from rolling. Heavy rocks or wooden blocks can work in emergencies.
Flashlight
Especially useful during nighttime emergencies.
Gloves
Protect your hands from dirt, sharp edges, and hot surfaces.
Reflective Triangles or Hazard Lights
These increase visibility and help alert other drivers.
Owner’s Manual
Your owner’s manual shows:
- Correct jack placement
- Spare tire location
- Vehicle-specific instructions
Safety Precautions Before You Begin
Safety is the most important part of changing a tire.
Before doing anything else:
Move to a Safe Location
Pull over to:
- A flat surface
- A stable area
- A location away from moving traffic
Avoid:
- Curves
- Hills
- Soft shoulders
- Busy traffic lanes
If you cannot safely pull over, it is better to call roadside assistance.
Turn On Hazard Lights
Hazard lights make your vehicle visible to other drivers.
Apply the Parking Brake
This prevents your car from rolling while lifted.
Use Wheel Chocks
Place wheel chocks behind the tire diagonally opposite the flat tire.
Example:
- If the front-right tire is flat, place chocks behind the rear-left tire.
Keep Passengers Safe
Passengers should stand away from traffic while the tire is being changed.
Step-by-Step Guide to Changing a Tire on a Car
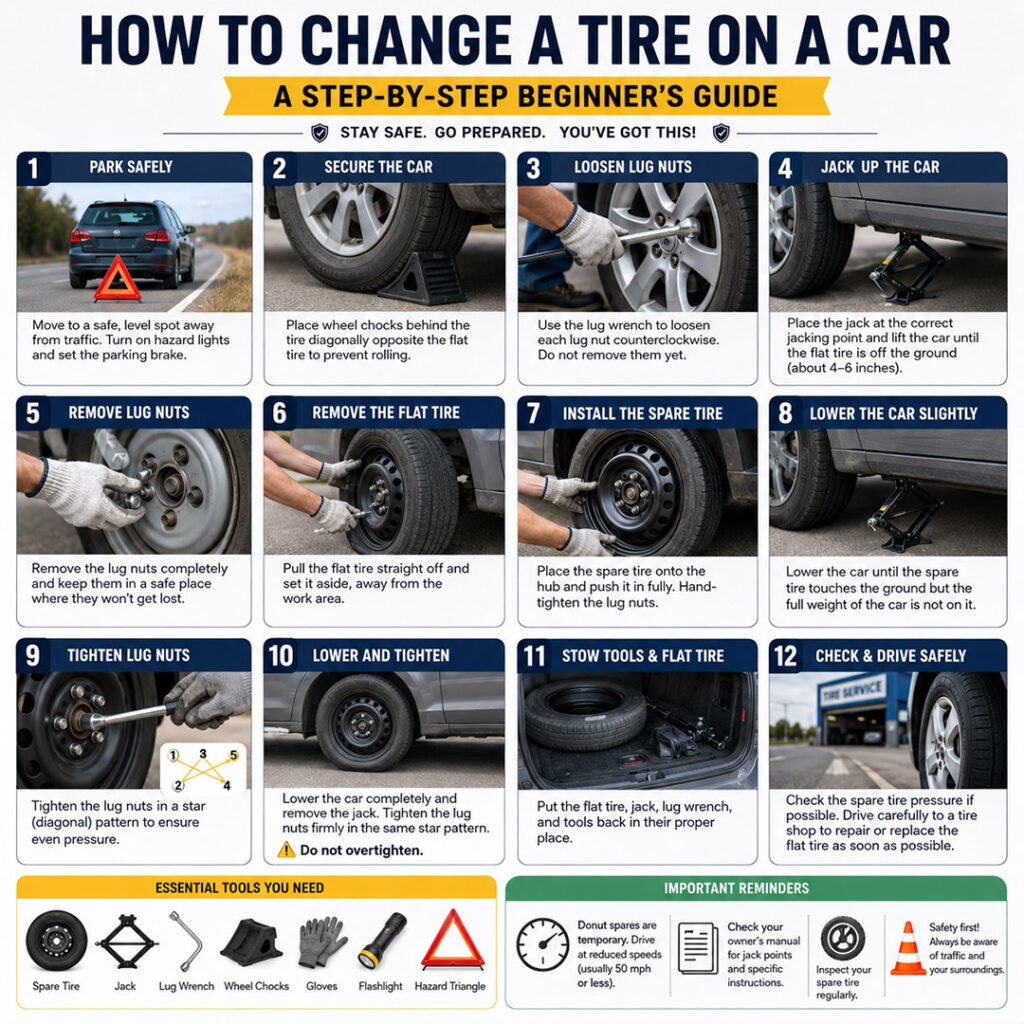
Now let’s go through the complete process step by step.
Step 1: Remove the Hubcap or Wheel Cover
If your vehicle has a hubcap covering the lug nuts:
- Use the flat end of the lug wrench
- Carefully pry off the hubcap
Place it somewhere safe to avoid losing it.
Step 2: Loosen the Lug Nuts
Before lifting the car:
- Turn the lug nuts counterclockwise
- Loosen them slightly
- Do NOT remove them completely yet
This step is easier while the tire is still touching the ground because the wheel will not spin.
Pro Tip
If the lug nuts are tight:
- Use your foot carefully for additional leverage
- Avoid sudden jerking motions
Step 3: Position the Jack Correctly
Locate the manufacturer’s recommended jacking point under the vehicle.
Your owner’s manual will show the exact location.
Why Jack Placement Matters
Incorrect placement can:
- Damage the vehicle frame
- Cause the car to slip
- Create dangerous instability
Once positioned:
- Raise the car slowly
- Lift until the flat tire is about 4–6 inches off the ground
Step 4: Remove the Flat Tire
Now:
- Fully remove the loosened lug nuts
- Place them in a safe spot
- Pull the flat tire straight toward you
The tire may feel heavy, especially on larger vehicles.
Roll the flat tire away from the work area so it does not interfere.
Step 5: Install the Spare Tire
Lift the spare tire and align it with the wheel studs.
Push it firmly onto the hub until fully seated.
Next:
- Hand-tighten the lug nuts
- Tighten them enough to hold the spare securely
Do not fully tighten them yet.
Step 6: Lower the Vehicle Slightly
Lower the jack until:
- The spare tire touches the ground
- The vehicle’s full weight is NOT fully resting on the tire
This allows the wheel to remain stable while tightening the lug nuts.
Step 7: Tighten the Lug Nuts in a Star Pattern
Use a star or diagonal pattern when tightening.
Example pattern:
1 → 3 → 5 → 2 → 4
This ensures:
- Even pressure distribution
- Proper wheel alignment
- Reduced vibration risk
After partially tightening:
- Lower the car completely
- Remove the jack
- Tighten the lug nuts firmly one final time
Also Read: How to Remove Kitchen Kickboards: Easy Step-by-Step DIY Guide
Common Mistakes to Avoid When Changing a Tire
Many beginners make avoidable mistakes that can create safety hazards.
Changing a Tire on Uneven Ground
Uneven surfaces increase the risk of the jack slipping.
Forgetting the Parking Brake
Without the parking brake, the vehicle may roll unexpectedly.
Removing Lug Nuts Too Early
Always loosen first—remove after lifting.
Incorrect Jack Placement
This can damage the frame or cause instability.
Overtightening Lug Nuts
Too much force can:
- Damage wheel studs
- Make future tire removal difficult
Driving Too Fast on a Donut Spare
Most donut spares are designed for:
- Short distances
- Reduced speeds
Always follow the tire manufacturer’s limits.
Real-World Example
A driver traveling through Arizona experienced a tire puncture late at night on a remote highway. Because they had practiced changing a tire beforehand, they safely replaced the flat tire in under 20 minutes and reached the nearest service station without needing an expensive tow truck.
This example highlights why learning this basic skill before an emergency matters.
What to Do After Installing the Spare Tire
Changing the tire is only the first step.
After installing the spare:
Check Tire Pressure
If possible, verify that the spare tire has proper air pressure.
Drive Carefully
Temporary spares are not designed for:
- Long trips
- High speeds
- Heavy loads
Visit a Tire Shop Quickly
A professional technician should:
- Repair or replace the damaged tire
- Inspect wheel alignment
- Check lug nut torque
How Long Does It Take to Change a Tire?
For most beginners:
- 20–30 minutes is typical
With experience:
- Many drivers can complete the process in under 15 minutes
Preparation makes a major difference.
Frequently Asked Questions
Can I Drive on a Flat Tire?
Driving on a flat tire is unsafe because it can damage the wheel, suspension, and braking system. You should pull over safely and replace the tire or call roadside assistance as soon as possible.
What Is a Donut Spare Tire?
A donut spare tire is a compact temporary tire designed for emergency use only. It is lighter and smaller than a regular tire and should only be driven for short distances at reduced speeds.
Do All Cars Have Spare Tires?
No, not all vehicles come with spare tires. Some modern cars include tire repair kits or run-flat tires instead of a traditional spare.
What If My Lug Nuts Are Stuck?
If the lug nuts are difficult to loosen, apply steady pressure using the lug wrench. Avoid sudden force that could damage the tool or wheel studs. If they remain stuck, roadside assistance may be necessary.
How Often Should I Inspect My Spare Tire?
You should inspect your spare tire every few months to make sure it has proper air pressure and is still in good condition for emergency use.
How Long Does It Take to Change a Tire?
Most beginners can change a tire in about 20 to 30 minutes, while experienced drivers may complete the process in under 15 minutes.
Can Beginners Change a Tire Safely?
Yes, beginners can safely change a tire by following proper safety precautions, using the correct tools, and carefully completing each step.
Where Should I Place the Car Jack?
The car jack should always be placed at the manufacturer’s recommended jacking point, which is listed in the vehicle owner’s manual.
Final Thoughts
Learning how to change a tire on a car is one of the most practical skills any driver can have. While it may feel stressful the first time, following the correct steps and safety precautions makes the process much easier.
Keeping the proper tools in your vehicle, regularly inspecting your spare tire, and understanding the basics of roadside safety can help you stay prepared for unexpected emergencies.
A little preparation today can save you time, money, and frustration when a flat tire happens tomorrow.